Proper wound cleaning is the cornerstone of safe and effective wound care. Cleaning a wound before applying a dressing helps prevent infection, promotes faster healing, and prepares the injury for optimal protection. Many people in Dubai rely on Wound Dressing at Home in Dubai services to ensure their wounds are cleaned and dressed correctly. In certain situations, consulting a Doctor at Home can help assess the wound and provide guidance for safe home care. Understanding the step-by-step process of wound cleaning is essential for anyone providing first aid at home.
Why Cleaning a Wound is Important:
Cleaning a wound is more than just removing visible dirt—it reduces the risk of infection and sets the stage for proper healing. Key reasons to clean a wound include:
- Removing debris, dirt, or foreign objects
- Lowering the risk of bacterial contamination
- Reducing inflammation and swelling
- Preparing the wound bed for effective dressing
- Promoting faster tissue repair and recovery
A clean wound ensures that the dressing can do its job without interference.
Gather Your Supplies:
Before you start cleaning, it’s important to have all necessary supplies ready. This ensures the process is smooth and minimizes contamination. Essential supplies include:
- Sterile gloves or disposable gloves
- Sterile saline solution or clean running water
- Antiseptic wipes or mild soap (if recommended)
- Sterile gauze pads or cotton balls
- Tweezers (sterilized) for removing debris
- Clean towels or cloths for drying
Having everything organized helps maintain a sterile environment and speeds up the process.
Wash Your Hands and Wear Gloves:
Hand hygiene is critical before touching any wound. Proper precautions include:
- Washing hands thoroughly with soap and water for at least 20 seconds
- Drying hands with a clean towel or paper towel
- Wearing disposable gloves to prevent contamination
- Avoiding touching the wound or surrounding area with bare hands
This reduces the risk of introducing new bacteria to the wound.
Stop Any Bleeding First:
If the wound is bleeding, it’s important to control it before cleaning. Steps include:
- Apply gentle, direct pressure with a sterile gauze pad
- Elevate the injured area if possible to slow bleeding
- Continue pressure until bleeding subsides
- Avoid using unsterile materials to stop bleeding
Controlling bleeding ensures a clearer view of the wound and reduces contamination.
Rinse the Wound Gently:
Rinsing removes dirt, debris, and bacteria from the wound surface without causing further damage. Guidelines include:
- Use sterile saline solution or clean running water
- Avoid harsh chemicals like hydrogen peroxide or alcohol on open wounds
- Gently flush the wound from the center outward
- Use low pressure to prevent tissue trauma
Rinsing is a critical step to prepare the wound for safe dressing application.
Remove Debris Carefully:
After rinsing, some particles may remain. Removing them reduces infection risk. Steps include:
- Use sterilized tweezers to remove visible debris
- Avoid digging into the wound or causing additional injury
- Rinse again after removing debris to ensure cleanliness
- Do not attempt to remove deeply embedded objects; seek medical help
Proper debris removal ensures a cleaner wound surface.
Apply Antiseptic If Recommended:
Using an antiseptic helps further reduce bacterial load, but it must be gentle to avoid tissue damage. Guidelines include:
- Apply a thin layer of recommended antiseptic solution or ointment
- Avoid excessive use that can irritate the wound
- Do not use harsh chemicals that can delay healing
- Follow guidance from healthcare professionals for sensitive wounds
Antiseptics help maintain a bacteria-free environment before dressing.
Dry the Wound Gently:
A moist wound is ideal for healing, but the surrounding area should be dry for proper dressing adhesion. Steps include:
- Pat the wound gently with sterile gauze
- Avoid rubbing or applying excessive pressure
- Ensure surrounding skin is dry to prevent dressing from slipping
- Maintain a clean surface for dressing application
Proper drying ensures the dressing adheres correctly and maintains protection.
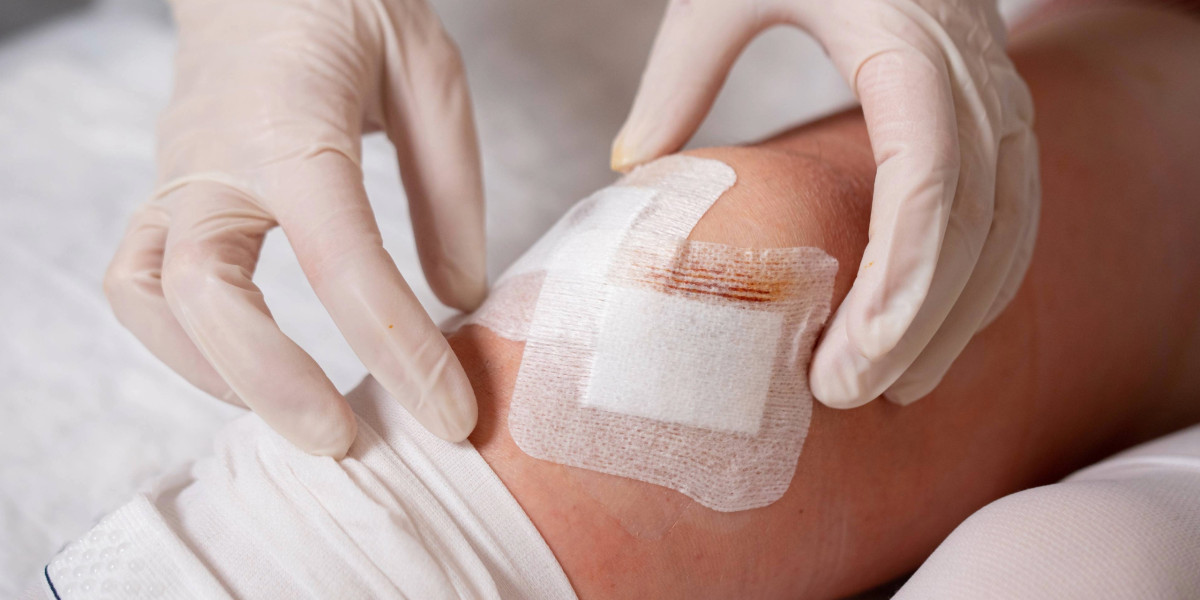
Apply the Dressing Properly:
Once the wound is cleaned and prepared, it’s ready for dressing. Key tips include:
- Use a sterile dressing appropriate for wound size and type
- Cover the wound completely while avoiding tight pressure
- Secure with adhesive tape or bandage without restricting circulation
- Change the dressing regularly according to wound type and instructions
Proper dressing protects the wound and supports faster healing.
Monitor the Wound:
After cleaning and dressing, ongoing monitoring is essential to detect complications early. Consider:
- Checking the dressing for moisture, leakage, or looseness
- Watching for signs of infection such as redness, swelling, or odor
- Noting any increase in pain or discomfort
- Seeking guidance from a Doctor at Home if any concerns arise
Consistent monitoring ensures safe home wound care and timely intervention if needed.
Final Thoughts:
Cleaning a wound before applying a dressing is a critical step in home wound management. Proper hand hygiene, gentle rinsing, debris removal, and antiseptic use create a safe environment for healing. For residents utilizing Wound Dressing at Home in Dubai, combining these practices with professional guidance from a Doctor at Home ensures optimal wound care, reduces infection risks, and supports faster recovery. Correct wound cleaning sets the foundation for safe dressing and successful healing at home.